
After 14 years a boat gets a chip or two in the gel coat. Apsaras had her fair share. And after the polishing was done, the chips and cracks became all the more apparent. So we contacted Mike and Christina to see if they knew of someone in the Bay Area who could help us out. Indeed, they had a great recommendation - Cary King. He had fixed over 100 chips in Amabile and polished the whole boat. Since we were to be in the area for several weeks we figured we could get the work done. Cary came and gave us a very reasonable estimate for the work. In the end we felt he could raise his price and be perfectly fair. He taught Melissa the whole process, and she can now fix a crack in the gel coat – provided, of course, that the damage isn’t structural. :-)
When Cary came to do the work, Melissa volunteered to help. While our original estimate was there were 16 chips, when Melissa marked them with blue tape, she counted over 40. Yikes. So she figured if she helped with a bit of sanding labor that might reduce the shock of the amount of work. Cary made one small mistake in thinking Melissa actually knew something about bondo. So after sanding a dozen small holes in the cockpit, he handed her the bondo, hardener, and spatula and told her to fill the 1/8” cockpit holes. She did this the same way she had seen Cary do the 6” cracks in the deck and hull. Lots of bondo! Ooops. Dave took one look at her work and about had a conniption (albeit quietly in his way). He got out the orbital sander and went at the spots trying his best not to burn through the gel coat, but take off the masses of bondo Melissa had applied. And then reapply the bondo because Melissa hadn’t actually filled the holes completely. Hmmm. This is like a teen ager lesson where Dad teaches his son to apply bondo to a car dent needing repair, huh?
Ok, now that all the bondo is filing the cracks, its time to apply the gel coat. First we needed to tape up a 4” area around the spots if there were anything that couldn’t handle a bit of overspray such as stainless steel stanchions or other deck hardware. Fortunately, Apsaras is “white right out of the bottle” and hence didn’t require any color matching. Thank goodness!
So Cary put the gel coat into a spray bottle (a cheap one he could throw away later), and just sprayed it on. He would dab any runs, but wasn’t overly concerned with getting it perfect at this point. Melissa went behind him marking the paint spots with a piece of blue tape because once you put the gel coat on its super hard to see the spots you will need to wax and sand later.
The next day he came back to start sanding the gel coat. Melissa again was there to assist. She managed to “burn through” most of the spots she sanded – thereby exposing the bondo underneath and thereby requiring more gel coat to be applied. She figured this was because she was a newbie. Which is probably true. However, we later determined there were several improvements needed in the process. First, we decided the process of spraying on the gel coat with the cheap plastic bottle sprayers was problematic. The gel coat went on very unevenly and left lots of high and low spots making sanding very difficult. Moreover, the sprayer would leave a lot of “overspray” (light spray around the area to be treated) that also had to be sanded. Second, for the process to work well, the bondo has to be applied in such a way that there are no high spots and it has to match the curvature around it (boats aren’t flat!). So anyplace where you sand through to the bondo, likelihood is that the bondo needs to be sanded down underneath. So keep sanding once you’ve burned through to get the surface better prepared.
This led to one improvement that we will stick with – instead of spraying on the gel coat, Melissa started using a small sponge brush. This worked great. No overspray to sand, you could control the thickness, and no lumpiness to sand out. This reduced the sanding to less than half the time. Oh, and you don’t have to tape the surrounding areas to try to protect them from the spray.
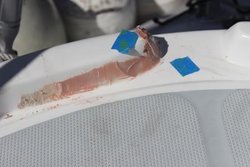
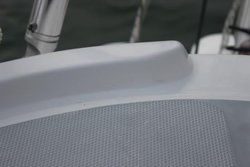
Here is a before and after picture of fixing a big chip and crack in the rear deck:
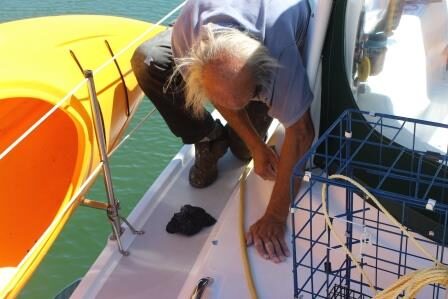
Cary and Melissa spent the better part of three days staring at the deck:
Here’s the whole process:
- Sanding with 180 / 320 sandpaper to prep the area
- If the area is a hairline crack, then take a chipper tool and chip some of the gel coat out around the crack so there is something to actually fill. Note that this only works on non-structural areas.
- Fill with bondo.
- Wet sand with 320. Feather this carefully so that the center where the chip is high and the surrounding area is feathered down to the gel coat.
- Clean with acetone
- Apply the gel coat with a sponge brush.
- After a minute, spray or paint on wax to cure the top coat.
- Wait a day for the bondo and gel coat to cure completely.
- Wet sand with 320 grade sandpaper around the edges of the gel coat to get the gel coat feathered in to the surrounding area. Use 600 grade sandpaper on a block to get the gel coat smooth. Then use 1000 to get the surface really smooth.
- Repeat steps 5 to 9 on any areas that get “burned through”.
- Rub with rubbing compound.
- Rub with polishing compound.